Working with Disk
Utility
Disk Utility is a very useful tool for working
with volumes. Beginning with Mac OS X 10.3, Disk Utility includes
the functionality provided by Disk Copy in previous versions of Mac
OS X. Disk Utility's user interface has changed to accommodate the
feature set of both programs. This section discusses the various
features of Disk Utility.
Disk Utility is the primary tool you will use
for volume and disk management. You will find Disk Utility on the
Mac OS X Install DVD and at /Applications/Utilities. You can run
Disk Utility before an installation to perform a number of tasks:
to check, repair, partition, and format drives; to create images of
existing data; or to mount or unmount and restore existing
partitions. Disk Utility can also be used as a diagnostic tool.
Note that you cannot erase or partition the startup disk.
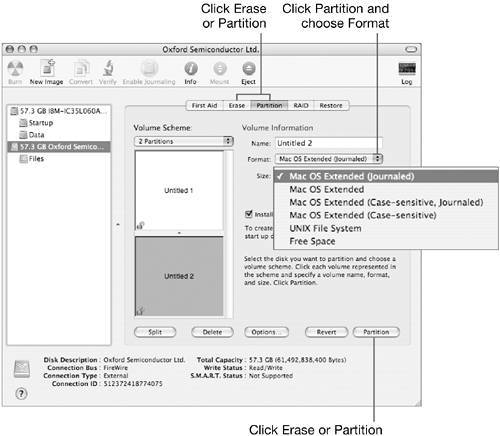
You will immediately notice disks and partitions
in the list at the left when you open Disk Utility. If you select a
disk, you can use the Partition pane to create partitions. You
cannot partition a partition; so the Partition pane is only
accessible if you select a disk. In the Erase pane, you can erase
the contents of a partition or drive and change its format. You can
also use this utility to erase CD-RW and DVD-RW discs.
If you plan to boot into Mac OS 9, and your
computer supports it, you must select the Install Mac OS 9 Disk
Drivers checkbox when you partition your hard disk. This formatting
option places Mac OS 9 startup drivers on the disk. If these
drivers are not present, you will not be able to start up the
computer in Mac OS 9. This option is not required for using the
Classic Environment in Mac OS X, because Classic can access drives
in the standard Mac OS Extended formats.
NOTE
The Mac OS 9 driver option is hardware dependent
and does not appear on systems that do not start up in Mac OS 9,
such as the Mac mini.
Getting Information
There are two easy ways to get in-depth
information about the drives and volumes connected to your
computer: System Profiler and Disk Utility. Each provides very
complete information about your drives and volumes, although the
information is presented in different contexts.
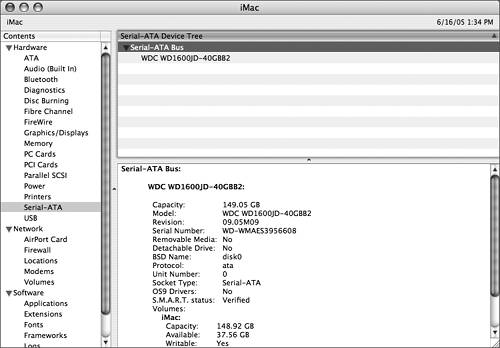
System Profiler (/Applications/Utilities) is
bus-oriented, and when it provides information about storage
devices, it identifies them in the context of the bus on which they
are located. When you select the drive bus on the left, you see all
devices on that bus (including hard drives, optical drives, and
other connected devices).
System Profiler is a reporting tool rather than a
utility that edits your disks and partitions, so it provides no
information about unmounted partitions on a particular disk.
Disk Utility is drive-oriented, so the left
column in Disk Utility contains a list of all connected drives.
Beneath each drive is an indented list of partitions on that drive.
Starting with Mac OS X 10.3, CDs recorded with multiple sessions
are displayed correctly as separate partitions in the left column
of the Disk Utility window. Unmounted partitions are dimmed, and
information about them cannot be gathered.
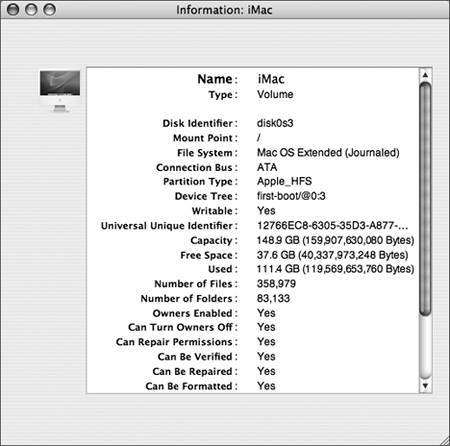
When a drive or
partition is selected from the list in Disk Utility, you can click
Info to display detailed information about the drive, such as the
drive's capacity and bus type.
Applying First Aid
The First Aid pane of
Disk Utility can repair permissions issues and disk format
problems. Unusual behavior, such as inability to mount disk images,
copy files, install applications, or spool print jobs, could be
caused by incorrect file permissions. Missing files and folders
could be caused by disk format problems.
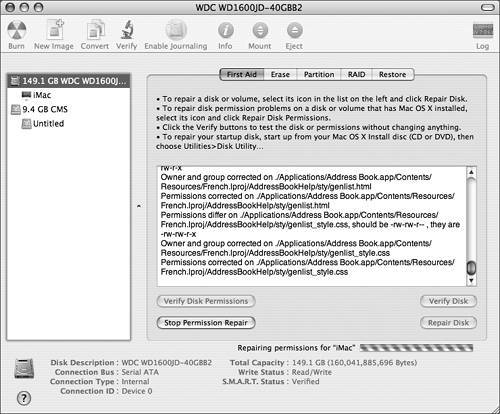
The Repair Disk Permissions button restores the
default permissions of Mac OS X system files and applications in
the Applications folder on the startup disk only. Disk Utility
restores the default permissions of items installed by the Apple
installer based on information in the installation receipt packages
stored in /Library/Receipts. However, many third-party installers
do not store installation receipts. This means many applications
installed with third-party installers, and any applications
installed by drag-and-drop, will not be affected by the Repair Disk
Permissions feature. While Disk Utility does not fix permissions on
those files, it is easy to manually correct file permissions, as
you will see in later lessons.
The Repair Disk feature verifies and repairs the
folder structure of a volume, using the BSD tool fsck.
Disk Utility can perform repairs on partitions in all of the
formats that it can create: UFS, Mac OS Standard, Mac OS Extended,
and MS-DOS (FAT).
Because you cannot repair your startup disk
while your computer is booted from it, you would normally use
Repair Disk from your Mac OS X Install DVD. You could also repair
your startup disk using a second computer, with your computer
connected in Target Disk Mode.
If Disk Utility indicates that it discovered
problems after you click Repair Disk Permissions or Repair Disk,
repeat the process until you get a clean bill of health.
Remember, the options available in the First Aid
pane are just thatyour first line of defense against minor disk
injuries. For more serious trauma cases, you'll want to rely on
more powerful third-party tools.
Using Secure Erase
The Erase pane in Disk Utility allows you to
securely erase free space or an entire volume. If you wish to
ensure that files previously placed in the Finder's Trash are
completely erased, start by clicking the Erase Free Space button.
If you wish to erase an entire drive or partition, start by
selecting it and clicking the Security Options button.
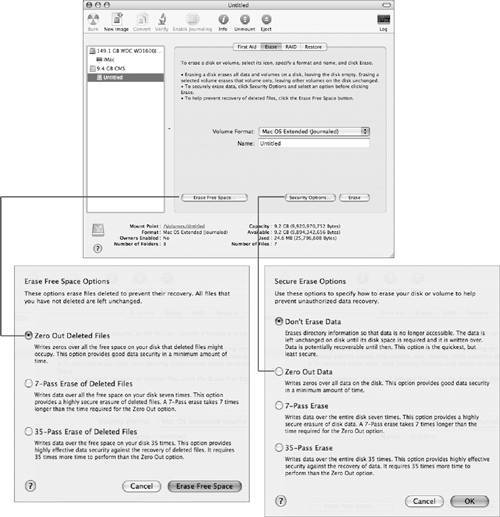
Whether you are securely erasing free space or
an entire volume, Disk Utility's options are fairly
straightforward. In both methods, you can select Zero Out Data,
7-Pass Erase, or 35-Pass Erase. Zero Out Data writes a single pass
of zeros over the portions of the disk being erased, while 7or
35-Pass will write and delete random zeros and ones for the
specified number of passes.
While the multipass erase options take time to
run, they provide a highly secure mechanism for ensuring that the
data on a drive cannot be restored. This is very useful when
retasking a computer or transferring a drive between employees with
different levels of security access, or clearing a home machine for
a change of ownership. Allocate plenty of time for a multipass
erase.
NOTE
7-Pass Erase meets current U.S. Department of
Defense security requirements. Use 35-Pass Erase for very sensitive
data.
NOTE
The Finder also supports a Secure Empty Trash
option that performs a 7-Pass Erase on items in the Trash. Files
erased this way do not need to be erased again with Erase Free
Space unless you wish to apply more erase passes to the files.
Configuring RAID
Disk Utility provides a tool to configure a
software RAID in Mac OS X. Redundant Array of Independent Disks
(RAID) is used to configure multiple hard disks so that they appear
as one volume in the operating system (sort of the opposite of
partitioning, which makes one hard disk look like multiple
volumes). You can configure the RAID scheme to use concatenation or
striping (RAID 0), which stores data across the disks, or mirroring
(RAID 1), which stores the same data on all disks. With RAID 0
selected, a single volume will display the drive capacity as the
total amount of all drives being used in the array.
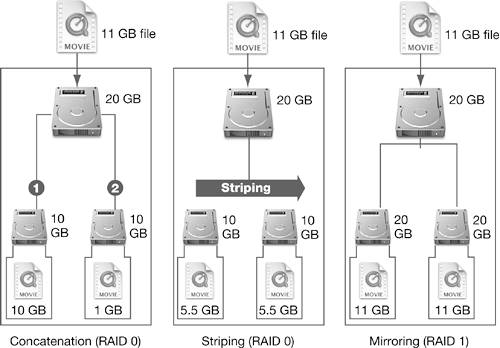
This illustration explains how an 11 GB file is
saved to disk under the different RAID schemes. At the left, two 10
GB drives act as one regular-speed 20 GB volume with concatenation.
Center, two 10 GB drives act as one fast 20 GB volume with
striping. Right, two 20 GB drives act as one 20 GB mirrored volume.
As always, all disks in a RAID should be the same size, as RAID
will use the lowest-common denominator size (30 GB and 20 GB
striped together would make a 40 GB volume).
NOTE
New in Mac OS X 10.4 is the ability to use
partitions in creating a RAID.
-
Concatenation (RAID
0) The most basic form of RAID 0. This form allows multiple
drives to be treated as a single volume, although without
performance benefits or redundancy. In the Finder, two concatenated
10 GB drives appear as a single 20 GB volume. Data written to this
volume is written to the first drive until it is full, and then
written to subsequent drives in the RAID as needed. Concatenated
RAID volumes are often referred to as "JBOD" (Just a Bunch of
Disks).
-
Striping (RAID
0) Allows multiple drives to be treated as a single volume,
although data is striped across all disks. This allows performance
improvements because each drive can access the bus separately,
improving throughput.
-
Mirroring (RAID
1) Stores the same data on all disks, allowing redundant
data storage. However, although RAID 0 drives are added together to
create the full volume size available in the Finder, a mirrored
RAID will appear in the Finder to be the size of the smallest
physical disk.
NOTE
Each RAID format has risks and advantages. Keep
in mind that mirroring is the only RAID format that provides data
redundancy.
Exploring Disk Utility
In this exercise, you will explore the features
available in Disk Utility.
|
1.
|
Log in as Chris Johnson.
|
|
2.
|
In the Finder, choose Go > Utilities
(Command-Shift-U).
|
|
3.
|
Open Disk Utility.
|
|
4.
|
Select the entry in the list that represents
your main hard disk.
The disk entry usually has the manufacturer name visible. Do not
select the formatted drive partition, the entry that is indented
beneath the drive entry. Note that the Partition button is
available when you select a disk.
The bottom of the screen displays details about the disk drive,
such as its total capacity and its connection bus.
|
|
5.
|
Note the capacity of your main disk
drive.
|
|
6.
|
Note the connection bus used for your
computer.
Your connection bus would depend upon the computer you are using,
but would most likely be either ATA or Serial ATA. Less likely
buses would be SCSI, FireWire, or USB.
|
|
7.
|
Select the partition entry beneath the disk
drive entry.
Now that you have selected a partition, the Partition button is no
longer available, because you cannot partition a partition. Also
notice that the information at the bottom of the screen has changed
to display details for the selected partition. Disk Utility
displays the number of files on the partition, the partition's
format, and where in the file system the partition is mounted. If
you have selected the boot partition, the mount point is /.If you
had selected a non-boot partition, the mount point would be
/Volumes/name, where "name" is the name of the partition.
|
|
8.
|
Click the First Aid button.
The First Aid pane allows you to verify and repair disk permissions
and the disk itself. Because you have selected the partition from
which you are booted, the Verify Disk and Repair Disk buttons are
dimmed. In order to repair your main hard drive, you would need to
boot using another disk, such as the Mac OS X Install DVD.
On the other hand, the Verify Disk Permissions and Repair Disk
Permissions buttons are only available when you have selected a
boot volume.
|
|
9.
|
Click the Erase button.
The Erase pane allows you to erase free space on a partition or
completely erase a disk or partition. In this case, you have
selected your boot volume, so the Security Options and Erase
buttons are dimmed. You could erase free space.
|
|
10.
|
Click the RAID button.
The RAID pane is used to combine two or more volumes into a RAID
volume.
|
|
11.
|
Click the Restore button.
The Restore pane is used when you want to restore applications and
files from a disk image.
|
|