|
|
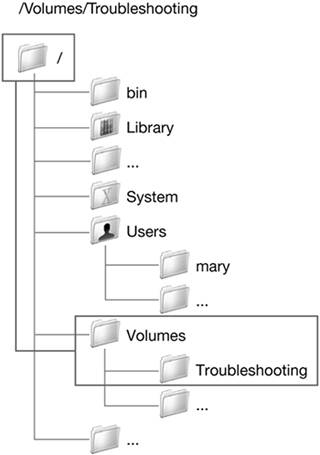
File System RepresentationsBefore you begin experimenting with some of the more useful command-line tools, make sure you understand how UNIX represents the file system. UNIX systems create a single hierarchy of folders and files (often described as an inverted tree) that includes all of the file systems available to the computer. The topmost folder is the root folder and is written as "/" (forward slash). There are no disks per se that are available to you via the command line. Instead, each disk is defined as a device in /dev, and each file system is mounted as a volume in /Volumes. Mounted volumes from connected devices appear as folders within the larger file system tree. Consequently, locating files using the command line often involves specifying a path starting at the root folder and descending through the tree to the required file or folder. For example, the Finder might present a network drive on your desktop with the name Troubleshooting. In the command-line interface, this corresponds to the folder /Volumes/Troubleshooting.
In Finder preferences, the General pane allows you to specify whether hard disks, removable media, and network volumes mounted with the Connect to Server command appear on your desktop. Volumes appearing on your desktop, however, are not really located in your Desktop folder. Therefore, they are not available to you on the command line with a path of the form ~/Desktop/volume. Instead, those volumes are available in the command line in the /Volumes folder. If you are ever in doubt about the file system path to a folder or volume, you can drag it into a Terminal window. Terminal will enter its full UNIX path at the command line. Volumes dynamically automounted from a server (such as network home folders) appear in the command line in the /Network/Servers folder. Network volumes mounted from the Network icon in the Sidebar at the left of the Finder windows are available in the /Volumes folder. Using Absolute and Relative PathsTo describe the location of a particular item, you can use either an absolute path or a relative path. An absolute path begins with / and indicates the path to the file starting at the root of the file system. A relative path indicates the path relative to where you are now. For instance, if you are logged in as chris and want to refer to the project folder inside the Documents folder for mary, you would need to include the file path starting at root: /Users/mary/Documents/project If, however, you were already in the home folder for mary, you could refer to the same folder with just Documents/project. You can also use some shortcuts to refer to relative paths. For instance, home folders can also be referred to by the tilde (~) character. It can be used to specify paths starting at your home folder. So entering ~mary refers to Mary's home folder. If you want to refer to the Library folder in your home folder, enter the shortcut ~/Library If you want to refer to the current working folder, you can use a single period (dot). To refer to the parent folder of the working folder, you can use two periods (dot dot). ../project Path names can be up to 1024 bytes long, starting from root. Directories and Files Not Seen in the FinderThe Finder presents only a subset of the files that actually exist in any file system. Some files, such as the file system catalog and desktop database files, are marked as hidden. The Finder elects not to show some other files and folders, such as those that are used during system startup or are less likely to be of interest to general users.
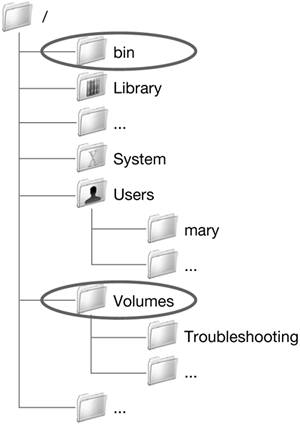
There are two types of hidden files and folders in Mac OS X: those with the invisible bit set, and those whose names start with a period (.).Using the command-line interface, you can list these hidden files. By entering the command ls -la ~/, for example, you can list all folders and files, including hidden files, located in your home folder. NOTE Items that are hidden in Mac OS X are visible when using Mac OS 9. Be very careful never to delete a file or folder in Mac OS 9 unless you are absolutely certain it is not needed by Mac OS X. Locating FilesMac OS X introduces a number of predefined folders intended to contain files of particular types. Many applications depend on the name and location of these folders, and they should not be renamed or moved. Most applications in the Mac OS X graphical interface reside in /Applications, and operating system files reside in /System. By convention, UNIX programs store their configuration information in the hidden folder /etc; most command-line tools are installed in the hidden folders /bin, /sbin, /usr/bin, or /usr/sbin. These four folders are the four locations that shells search to find programs whose names you enter on the command line. If you want to manually add a new program for the command line, you could place the file in one of these hidden folders, but a better solution would be to store it in a visible folder. Programs in locations other than the four default folders may be executed by specifying an absolute or relative path to the executable program. The current folder is not part of the default search path on Mac OS X. This is important for Windows users, but it is a security risk to have a shell include the current folder in the search path, because it could allow unauthorized applications to execute. Understanding Frequently Used CommandsLocating, creating, copying, and deleting files and folders are the main tasks that casual users will perform using the command line. The few commands described here allow you to complete such tasks many different ways. These commands are commonly used to administer and troubleshoot any UNIX-based system. Although the names of commands may appear cryptic at first glance, you will find that most shell commands have been given names that attempt to be mnemonic. Oftentimes the command name is a common word without the vowels. lsThe ls command, used to list one or more files, is probably the most frequently used command. As a consequence of its frequent use, the ls command supports many options. For example, using ls with the -l option displays the file type, size, date, and permission attributes along with the name of the requested files. The use of many commands is simplified by the use of a current folder. All shells maintain a current folder for ease of specifying filenames used as arguments to commands. For example, entering ls with no files or folders specified will list the contents of the current folder. A file specification that doesn't begin with a forward slash (to identify the root) refers to a file or folder referenced from the current folder. cdThe cd command changes the current directory (folder) to the directory you specify. pwdUse the pwd command to display or "print" the working directory (folder). cp and mvUse the cp and mv commands to copy and move, respectively, items in the command-line interface. To copy a file from your Public folder to your Documents folder, use the cp command. For example: cp ~/Public/file_name ~/Documents/new_file_name To move a file from the Shared folder to your Documents folder, enter mv /Users/Shared/file_name ~/Documents/new_file_name NOTE Mac OS X 10.4 changed the cp and mv commands so that they copy forked files. However, previous versions of the cp and mv commands ignored resource forks. If you are using a previous version, use ditto to move forked files or put your files into archives or packages before moving them. rmThe rm command removes (deletes) the files that you name. You can list multiple files in a single command, use filename wildcards (discussed later in this lesson), or use a combination of both to remove many files with a single command. The command rm -i ~/Documents/*.rtf ~/Documents/*.txt removes all of the files whose name ends in ".rtf" or ".txt" that reside in your Documents folder. The -i option used in the example has rm ask whether or not you want to delete each file that you specify. Another commonly used option of the rm command is -R. This option requests that rm recurse though all files and folders in the named folders deleting all of the files and folders that it encounters. The command rm -iR ~/Documents/Projects removes the Projects folder and all of its contents, including other folders, from your Documents folder. Since the -i option also appears, rm will prompt you to confirm the deletion of each file or folder that it finds. NOTE Trash is not involved when you use these standard shell commands to remove files or folders. The files and folders that you remove cannot be recovered once the command has finished executing. mkdir and rmdirUse mkdir and rmdir, respectively, to make and remove empty folders. Using File-Related CommandsMany command-line commands and troubleshooting tasks involve manipulating files and their attributes. The more command allows you to view text files a page at a time. The touch command allows you to create an empty file with the specified name or, if a file with that name exists already, touch will update the modification date. The cat command allows you to concatenate the contents of one or more files and display them on the standard output device. For example, typing cat file1 > file2 causes the contents of file1 to be appended to the contents of file2. It is sometimes important to know which application is the default for commands you execute in your current shell. There are some shell-specific command differences that might make a difference if you are performing advanced tasks. To determine the folder containing a particular command, use the which command. To display a file's type, issue the file command followed by the name of the file or files whose type you wish to determine. Finding Files Using Locate and FindYou can use both the locate and find commands to search the file system for files matching certain criteria. The locate command uses a database describing the known files on your system. The locate database is built and updated automatically as long as your system is running at the appropriate time. By default on a Mac OS X system, the locate database is updated at 4:30 A.M. each Saturday. You can execute the script that updates the locate database using the command sudo /etc/weekly The locate command understands the wildcard characters used by the shell. In order to pass the wildcard character to the locate command, you must escape the character so that the shell doesn't process it. For example, the commands locate "*.rtf" or locate \*.rtf will print a list of all files with names ending in ".rtf," but locate *.rtf results in an error. The syntax for the find command is more complex than for the locate command, but the possible uses of find are much broader. The command find ~ -name "*.rtf" starts a search of the files in your home folder and lists all files with names ending in ".rtf." Using Shell Filename WildcardsShell filename wildcards provide a convenient way to specify a group of files based on a pattern. The wildcards supported by UNIX shells are asterisk (*), question mark (?), and square brackets ([ ]). The asterisk (*) wildcard matches any string of characters. For example, entering * matches all files, whereas entering *.rtf matches all files ending in ".rtf." The question mark (?) wildcard matches any single character. As such, it's more precise than the asterisk. For example, typing b?ok matches "book" but not "brook." The [ ] wildcard matches a single character in the list of characters appearing within the square brackets. A few examples will build your understanding of wildcards. Consider a collection of five files with the names ReadMe.rtf, ReadMe.txt, read.rtf, read.txt, and It's All About Me.rtf. Among these files:
To test your understanding of wildcards, use the touch command to create files with these names and then try these expressions, as well as some of your own creation, as a file specifier for the ls command. Executing Commands as Another UserThere are two ways you can execute commands as another user. The sudo command lets you run a command as the System Administrator. In the default Mac OS X configuration, only users belonging to the admin group are permitted to act as the System Administrator in this way. Precede the command you want to execute with sudo, as in sudo chown -R apple:staff ~apple/* and enter your password when prompted. In this way, you can run a command that must be executed as the System Administrator to complete successfully.
Two commands that might require sudo are chown (change owner) and chmod (change mode). For example, to change ownership of a file in your Documents folder to a user named "admin," enter sudo chown admin ~/Documents/file_name The chmod command changes the permissions on a particular file. To run chmod on a file that you do not own, you would need to use the sudo command and an admin password. The sudo command remembers the password for five minutes, so any further sudo commands entered during that time will not require you to reenter your password. You can execute commands as another local user with the su (switch user) command. If you type su with a username argument, you will be prompted to authenticate as that user, and your login prompt will change to reflect your current user state. Entering su apple would switch you to the apple account, as long as it was not protected using FileVault. Changing File AttributesWhen you change the ownership or permissions of an item using a command-line interface, the changes are reflected in that item's Info window in the Finder. Likewise, when you change the permissions in the Info window, the changes can be seen when displaying the item in a command-line interface. When displayed in a command-line interface, a file's permissions are represented by a ten-character descriptor. The first character indicates the type of file and is followed by three triplets of characters describing the read, write, and execute permissions (always in that order) for owner, group, and others, respectively. A hyphen serves as a placeholder if permission is not granted for a particular command.
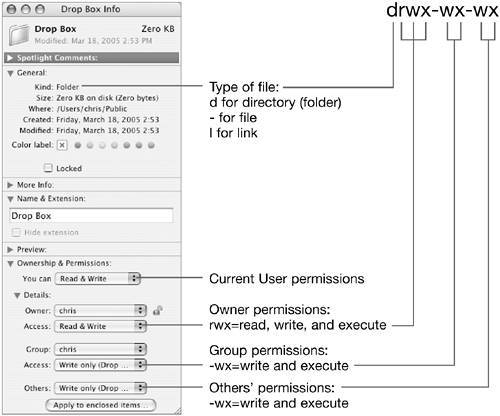
In this figure, the d in front of the permissions indicates that the file is a directory (folder). The permissions for the owner, rwx, correspond to Read & Write in the Info window for that folder. The x, or execute, permission on a file identifies a program that can be run. For a folder, the execute permission determines whether or not the folder can be searched. To access a file in a folder, you must have search permission for each folder from the root down to and including the folder containing the file. Execute permissions are also set on applications and on shell scripts, which must be executed to work properly. NOTE A shell script is a text file that contains UNIX commands to be executed together. Setting the execute bit indicates that this file is to function as an application (similar to an AppleScript file) as opposed to as a regular text file. Continuing with the example in the figure, the permissions for both group and others is -wx. Since a hyphen appears in the place where the read permission would normally appear, neither group nor others can see the contents of the folder. However, they can write to the folder, so the folder acts as a drop box, into which items can be blindly copied. Here are some examples of useful permissions you can set only from the command line:
The chown and chmod commands allow you to change the ownership and the permissions associated with one or more files. Use chown to change the owner or group assigned to a file. For example, chown apple:staff /Users/Shared/ReadMe.rtf assigns the user apple and the group staff to the file /Users/Shared/ReadMe.rtf. If you own a file, you can reassign the group for that file to another group as long as you are a member of the new group. You cannot, however, change the owner of a file unless you are the System Administrator. The chmod command chmod g+w,o-rw /Users/Shared/ReadMe.rtf adds write permission for members of the group assigned to the file ReadMe.rtf and removes read and write permissions for other users. The chmod command can also set the sticky bit on a file. A folder whose sticky bit is set becomes a folder with restricted permissions. A file in a sticky folder may only be removed or renamed by a user if the user has write permission for the folder and the user is the owner of the file, the owner of the folder, or the System Administrator. This allows you to create folders in common areas, such as /Users/Shared, that others can access but not delete. Changing Ownership of a FileIn this exercise, you will use a command-line interface to change ownership of a file. Changing the Permissions of a FileIn this exercise, you will use the chmod command to change the permissions of a file and try to open it, and then use the chmod command to change the permissions again so that you can open the file.
Logging In RemotelyThe ssh command lets you log in to a remote computer and execute commands as though you were at that computer. The ssh command makes its remote connections using SSH, which stands for secure shell. All communication between your computer and the remote computer is encrypted during your SSH session. The -l option allows you to provide a login name to the remote system, although the same can be accomplished by using username@hostname. Otherwise, your current short name will be used as the login name for the remote computer. To let another user access your computer remotely, you must select the Remote Login checkbox in the Services pane of Sharing preferences. Once enabled, a user can connect to your machine using ssh provided they know a user name and password that is defined on your machine. Note that remote connections are not possible with FileVaultprotected accounts, because encrypted home folders require a local login before they are accessible in the file system. When logged in remotely, the commands you enter in that session are sent over the network by SSH and are executed on the remote machine. This has two primary consequences:
Using Apple Remote Desktop to Send CommandsIn addition to using SSH to execute commands on a remote computer, you can also use Apple Remote Desktop (ARD) to run shell commands or scripts on a remote computer. NOTE While the ARD client is included with Mac OS X 10.4, the full administration application for ARD is available separately in either a 10-client or unlimited-client edition. For more information, visit www.apple.com/remotedesktop. The Execute UNIX Commands feature in ARD 2.1 allows sending a UNIX command or script to a Mac OS X client computer, provided that computer's access privileges are properly configured in the Services pane of Sharing preferences. After the command completes, Apple Remote Desktop displays a window listing the results of the command.

The advantage of using ARD to send shell commands is that ARD allows you to execute shell commands on multiple computers, where SSH only connects to a single computer at a time. A downside to using ARD is that it is not interactive like SSH. You send a command and get the results in a new window. NOTE Turning on ARD or SSH access can potentially present a security hole, as both allow remote users access to the computer. If you do enable either, be very strict with sharing the ARD or admin account passwords. Users with either password can enable both SSH and ARD access and gain complete control of the computer and monitor. Using Mac OS XSpecific CommandsMac OS X systems have some important commands that you won't find on other UNIX platforms. They are stored in /usr/bin. The pbcopy and pbpaste commands (located in the folder /usr/bin) are used to move text to and from the "pasteboard," which is called the clipboard in Mac OS X. For example, ls -lS ~/Documents | pbcopy places a listing on the clipboard of all files in your Documents directory sorted by file size, which you could then paste into a TextEdit document or Mail message. Property-list (plist) files are used to store preference settings such as system settings and application preferences. The plutil command can be used to check the syntax of plist files, or convert a plist file from one format to another. For example, plutil /Library/Preferences/*.plist verifies the format of the plist files in /Library/Preferences. The softwareupdate command allows you to view the list of available updates and install updates that you specify. GetFileInfo and SetFile are installed as part of the Developer Tools package in /Developer/Tools. These tools allow you manipulate HFS files with resource forks, and get and set file attributes (such as type and creator) associated with HFS files. The open command allows you to use the command line to open a file as if you had double-clicked it in the Finder. The asr command allows you to perform tasks using Apple Software Restore. The system_profiler command provides command-line access to the same information as the System Profiler application. The hdiutil command allows you to perform hard drive configuration at the command line. The ditto command is a copy command that works with flat files and files with resource forks. To copy a file and its resource forks, enter the following command: ditto -rsrcFork source_file destination_file NOTE The standard command-line utilities in the versions of Mac OS X prior to 10.4 did not include support for resource forks. GetFileInfo and SetFile commands are installed into the folder /Developer/Tools as part of the Developer Tools package. They allow you to manipulate HFS files with resource forks, and to get and set file attributes (such as type and creator) associated with HFS files. |
|