Providing Web Services
When you perform a default installation of Mac
OS X, the industry-standard Apache Web server software is
installed. This powerful software allows you to host websites on
your Mac, serving HTML pages to remote users across the Internet or
to local users on an intranet.
By default, Mac OS X creates a single main
website for the computer and separate websites for each user with a
home folder on that computer. These aren't full-blown sites like
you find when you surf the Web; they are placeholders for sites
that you can create.
If you choose to create your own sites, which is
completely optional, you need to understand how to create HTML
documents, which is beyond the scope of this lesson. However, you
can find many books on the subject, as well as third-party programs
that make the process simple enough for nonprofessionals. To allow
users to view web pages on your Mac OS X computer, enable Personal
Web Sharing in the Services pane of Sharing preferences.
Using the Mac OS X Main Website
Your computer's main
web page is located in /Library/WebServer/Documents, and the
default "home page" is index.html.en, assuming you selected English
as your language during the installation of Mac OS X. (The
two-character extension identifies the document's language.) When
accessing the Mac OS X main website, it is not necessary to include
the two-character language extension; the page will display in the
system default language.
NOTE
This description of file locations assumes the
default Apache configuration that installs with Mac OS X. It is
possible to reconfigure Apache by editing configuration files, but
that topic is beyond the scope of this lesson.
You can modify or replace the files in
/Library/WebServer/Documents with the actual content you want to
present, and you can delete all of the HTML pages for languages you
do not plan to support.
To access the main web page of your computer,
open a web browser such as Safari, and in the address field, enter
the URL followed by the IP address, DNS name, or local hostname of
your computer, such as
http://192.168.0.102
Creating Mac OS X User Websites
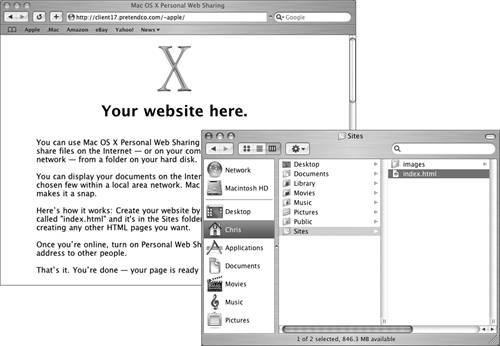
Whenever a new user account is created, Mac OS X
creates a ~/Sites folder containing a file called index.html and an
images folder.
If you want to create
and display a personal web page, you can replace this file and
folder with whatever you need.
To access your personal web page on your
computer, open a web browser such as Safari, and in the address
field, enter the URL followed by the IP address, DNS name, or local
hostname of your computer, followed by a slash (/), a tilde (~),
and your short name, such as
http://192.168.0.102/~chris
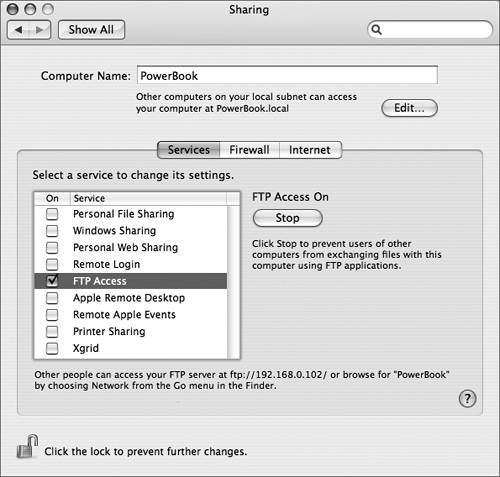
Enabling Personal Web Sharing
To allow users to view web pages on your Mac OS
X computer, enable Personal Web Sharing. When you do so, Sharing
preferences displays the URLs for your main web page and for user
web pages. Users should enter these URLs into the address field of
their web browsers to connect to this computer.
Follow these steps to enable Personal Web
Sharing on your computer:
|
1.
|
Open Sharing preferences.
|
|
2.
|
Click Services.
|
|
3.
|
Select Personal Web
Sharing, then click Start, or turn on Personal Web Sharing by
selecting its checkbox.
It may take a moment for Personal Web Sharing to start. When it
does, the Start button changes to Stop, and the top of the window
explains how other computers on your local subnet can access your
computer. At the bottom of the window are similar instructions that
are also applicable to local users, but intended primarily for
users outside your local subnet. For these instructions to work
properly, it may be necessary to enable port forwarding on your
router, and that's beyond the scope of this book.
|
|
4.
|
Note the clickable web addresses given to your
server at the bottom of the window.
The first URL is for the Mac's website and should be http://
followed by the IP address of your server, followed by a slash,
such as
http://192.168.0.102/
The second URL is the same as the first, with a tilde (~) and your
short name appended. This is the URL for your personal website,
such as
http://
192.168.0.102/~chris/
|
Verifying Personal Web Sharing
In this exercise, you will view the web pages on
your server.
|
1.
|
Click the first link at the bottom of the
Sharing preferences window to view the computer's website. Safari
will automatically open and display the default web page.
|
|
2.
|
In addition to clicking the link to view the
server's main website, in the browser's address field, enter
http:// followed by your server's
IP address, DNS name, or local hostname, then press Return.
For example:
http://192.168.0.102
http://powerbook
http://powerbook.local
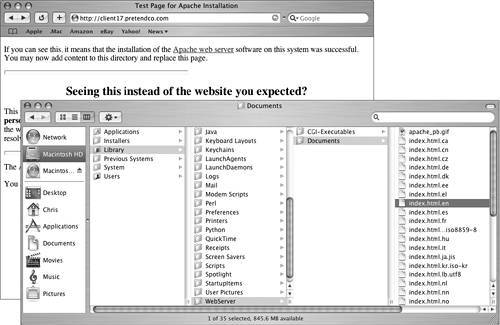
You should see a web
page in a window titled "Test Page for Apache Installation."
|
|
3.
|
Try using the other address formats.
All of them should work.
|
|
4.
|
To view a user's personal website, in the
browser's address field, enter http:// followed by your server's IP address,
DNS name, or local hostname, followed by a slash, a tilde, and the
user's short name, then press Return.
For example:
http://192.168.0.102/~chris/
http://powerbook/~chris/
http://powerbook.local/~chris/
You should see a web page in a window titled " Mac OS X Personal
Web Sharing."
|
|
5.
|
Try using the other address formats.
All of them should display the same page.
|
Modifying the Home Page Files
Editing and creating HTML is beyond the scope of
this book, but the basic concept is presented here to show the
results of simple changes to the default web pages.
To edit the main and user web pages, follow
these steps:
|
1.
|
In the Finder on your server, open TextEdit
(/Applications).
An empty window appears.
|
|
2.
|
Choose TextEdit > Preferences.
The Preferences window appears.
|
|
3.
|
Click the "Open and Save" button.
|
|
4.
|
Select the "Ignore rich text commands in HTML
files" checkbox.
This setting allows you to edit HTML files as text.
|
|
5.
|
Close the Preferences window.
|
|
6.
|
Close the blank document.
|
|
7.
|
In the Finder, navigate to
/Library/WebServer/Documents.
A useful shortcut to navigate to deeply-nested folders is the Go to
Folder command. Press Command-Shift-G, then enter the path
directly. Tab-completion works in the Go to Folder dialog, so you
could navigate to /Library/WebServer/Documents with the following
steps:
- a. In the Finder, press Command-Shift-G to open the Go
to Folder dialog.
- b. Enter /Li and press
Tab to auto-fill "/Library/"
- c. Enter webs and press
Tab to auto-fill "WebServer/"
- d. Enter do and press
Tab to auto-fill "Documents/"
- e. Press Return to open the folder.
|
|
8.
|
Open the index.html.en file by dragging and
dropping the file onto the TextEdit icon.
|
|
9.
|
Change the line that reads
<title>Test Page for Apache Installation</title>
to read
<title>Test Page for
Reader</title>
|
|
10.
|
Save and close the document.
|
|
11.
|
Navigate to /Users/apple/Sites/ in the
Finder.
|
|
12.
|
Open the file index.html by dragging and
dropping the file onto the TextEdit icon.
|
|
13.
|
Change the line that
reads
<BODY BGCOLOR=#FFFFFF>
to read
<BODY BGCOLOR=#FFFF00>
|
|
14.
|
Save the file.
|
|
15.
|
Quit TextEdit.
|
Testing the Modified Home Page
Files
To verify the changes you made, follow these
steps:
|
1.
|
Open Safari on the client.
|
|
2.
|
In the Address field, enter the web address of
your server's main website, for example:
http://powerbook.local
The title at the top of the page should now reflect the change you
just made.
NOTE
It might be necessary to refresh the contents of
your browser's cache. In Safari, choose View > Reload Page
(Command-R).
|
|
3.
|
Enter the web address of your computer's
personal website for the user Apple Admin, and verify that the
page's color has changed.
|
|