|
|
Installing Mac OS XAll new Macintosh computers come with Mac OS X preinstalled and most also come with Mac OS X on CD or DVD, in case the operating system needs to be reinstalled. This book assumes you are using Apple's Mac OS X 10.4 retail package that contains a single DVD with a simple Installer to guide you through the installation. If you are using the model-specific discs that came with your Macintosh, you may notice minor differences in the screens and examples used here.
Verifying RequirementsThe first step to take before attempting to install Mac OS X is to verify that the intended computer meets the minimum system requirements. If you don't know your computer's specifications, use System Profiler (/Applications/Utilities) to determine its specifications. Mac OS X 10.4 requires the following:
NOTE For more information about installation requirements, see the complete list of supported computers at www.apple.com/macosx/upgrade/requirements.html. Preparing for InstallationAlthough you can certainly dive right in and install Mac OS X without any forethought, you'll be better served in the long run if you prepare for installation by taking some precautionary steps.
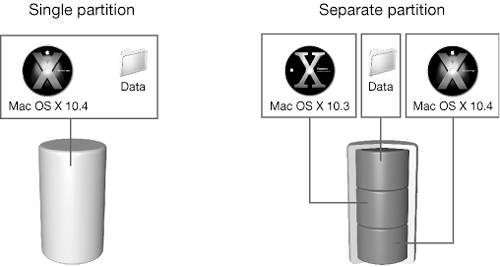
Upgrade to Mac OS 9.2 or LaterIt is not necessary to have Mac OS 9 installed when upgrading to Mac OS X; Mac OS 9 is required only if you wish to run Classic applications in Mac OS X. In that case, you must install Mac OS 9.2 or later, either before or after installing Mac OS X. If you are using a Macintosh that will boot Mac OS 9, you should first install Mac OS 9 and then install any print drivers and fonts that you will use in the Classic environment in that System Folder. Use the Software Update control panel to make sure you have updated to the latest version (9.2.2 as of this writing). On newer computers that cannot boot Mac OS 9, you will need to copy over a licensed Mac OS 9.2 or later System Folder from another machine. After you install Mac OS X, you will use Classic preferences to configure your computer to run your Mac OS 9 applications. For more information on Classic, see Appendix D, "The Classic Environment." If you are upgrading from one version of Mac OS X to another, it is likely that your hardware and software will simply continue working as they always have. However, if you are upgrading from Mac OS 9, you must run your existing programs in Classic mode (which runs Mac OS 9 within Mac OS X), or switch to native Mac OS X alternatives (Safari for browsing, Mail for email, iCal for appointments, etc.), many of which are included with the new operating system. Choosing a Partition MethodPartitioning divides a disk into sections, or volumes, each of which works like a separate disk. However, because you must erase a drive to split it into partitions, you should make the decision to partition early in the configuration process to avoid the laborious process of backing up data, partitioning, and then restoring.
You can install different versions of Mac OS X on separate partitions of the same volume. Furthermore, Mac OS X and Mac OS 9 can inhabit the same volume without any problems, and you can switch between them as needed, provided your computer is capable of booting Mac OS 9. The following table discusses the pros and cons of keeping the two together on a single volume (or partition) versus on separate partitions. Partition Method Issues
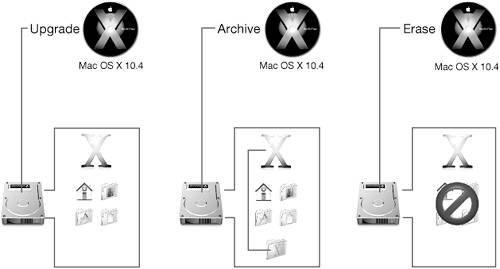
One of the advantages of having two separate partitions is that if the operating system on the main partition becomes corrupted and unbootable, you can use the Startup Manager to boot from the operating system on the second partition. If you press the Option key while the computer boots, the Startup Manager will scan each partition on any connected drive and display an icon representing the operating system last used on that partition, if one exists. Select an icon, and the computer will boot using the selected System folder. NOTE Some Macintosh computers start up only in Mac OS X and cannot boot Mac OS 9. For more information, refer to Knowledge Base document 86209, "Macintosh: Some Computers Only Start Up in Mac OS X." If you install Mac OS X and Mac OS 9 on the same partition, the hard disk must be formatted as Mac OS Extended (Journaled). If you are installing Mac OS X on its own partition, Mac OS Extended is the recommended hard disk format, but you can also use UNIX File System (UFS) if, for example, you want to develop UNIX-based applications within Mac OS X. NOTE Although applications running in the Classic environment can read and write files from a UFS partition, the Classic environment can only start from a Mac OS 9 System Folder located on a Mac OS Extended partition. Also, you will be unable to read files from a UFS partition if you boot Mac OS 9. Based on the preceding information, determine if you want to install Mac OS X on its own partition, or if installing it alongside Mac OS 9 is acceptable. If you need to partition the drive, you can use Disk Utility (included on the Mac OS X Install DVD), but you should know that partitioning a drive is a time-consuming process that necessitates a full backup before starting if you want to retain your files. NOTE With software such as Coriolis Systems' iPartition (www.coriolis-systems.com) or Prosoft Engineering's Drive Genius (www.prosofteng.com), you can repartition volumes without requiring erasure. Use any third-party utilities at your own risk. Performing the Mac OS X InstallationYou can start the Mac OS X installation process by booting from the Mac OS X Install DVD (with the disc in the drive, press the C key during startup) or by launching the Install Mac OS X application in the Finder, which will restart the computer and boot the computer from the disc. NOTE If you are installing Mac OS X on a PowerBook or an iBook, the computer needs to be plugged into an AC power source to avoid exhausting battery power before the installation is complete. The Installer is largely self-explanatory. When in doubt, let the onscreen instructions guide you. After selecting your language, continue through several screens that welcome you, explain the requirements, and then request your agreement to the software license terms. It's only when you select where and how Mac OS X is installed that you need to think carefully about your choices. Selecting the DestinationIn the Select Destination window, you select which volume will receive the operating system installation. Mac OS X can only be installed onto Mac OS Extended or UFS volumes. If you have multiple volumes from which to choose, keep in mind the pros and cons discussed previously in "Choosing a Partition Method." Choosing the Installation TypeIf you wish to perform the default installation method, click Continue after selecting the destination. Otherwise, click Options to see your installation options. (The Options button appears only after a destination volume is selected.) The following table discusses the pros and cons of the three installation methods.
Installation Type
The Archive and Install option is similar to the Clean Install option in Mac OS 9the existing System folder is archived into a Previous System folder, and a fresh version of the operating system is installed. If Mac OS X is not already present and configured, Archive and Install is not available as an option. NOTE You can't start your computer using the Previous System folder if you want to undo your new installation. The Previous System folder is retained only so that you can manually restore specific files as needed after installation. If you do not need the contents of the Previous System folder for troubleshooting, you should discard the folder after you have determined that the new installation is working properly. Even though you won't be using the Previous System folder, you can retain many of your user and network settings. In the Installation Options sheet, select the "Preserve Users and Network Settings" checkbox to automatically import existing users, home folders, and network settings during installation. (If you select this option, the Setup Assistant will not appear after the installation.) The following settings are not preserved after an Archive and Install:
NOTE The /etc directory does not appear when browsing in the Finder. For information on accessing hidden directories, see Lesson 4, "File Systems." If you choose the Erase and Install option, you must specify whether to reformat the destination volume as either Mac OS Extended or UNIX File System.
NOTE Keep in mind that Mac OS Extended is the recommended volume format for Mac OS X. If you do have a need for UFS, consider creating two partitions: a Mac OS Extended partition for Mac OS X and Mac OS applications, and a UFS partition for UNIX applications. MORE INFO Refer to Knowledge Base document 25316, "Mac OS X 10.2 or Earlier: Choosing UFS or Mac OS Extended (HFS Plus) Formatting." Customizing the PackagesBy default, after selecting the destination and choosing the installation type, the installation proceeds with the Easy Install configuration, which installs the following packages:
This additional package is not installed by default:
If you click the Customize button, the Installer shows you a list of packages to be installed. Some packages are optional, such as Printer Drivers and Additional Fonts, but are selected for installation by default. If a checkbox contains a minus sign (), the package is made up of smaller packages, and not all subpackages will be installed. Click the disclosure triangle next to the package to list the subpackages. Once installation has begun, the Installer shows the percentage completed. The time required to complete the installation depends upon the options chosen, the speed of your computer, and the speed of its optical drive. It is not uncommon for the Installer to require over an hour to complete the entire process. If the screen goes blank during the installation process, press any key. Do not interrupt the process, or the computer may be left inoperable with only a partially installed operating system. |
|